How to Use sf::Window::setIcon()
sf::Window::setIcon() changes the window's icon at runtime, i.e. the icon in the taskbar as well as the icon in the window title bar is changed to whatever image data you provide.
The functionality is quite easy to understand, but looking at the function signature, some general knowledge about SFML is required.
The function takes two arguments:
sf::Vector2u size– Size of the icon in pixelsconst std::uint8_t* pixels– Pointer to the first element of an array of RGBA pixel values
The first two arguments don't really need explanation, the important bit is that they are measured in pixels. The third argument however isn't exactly obvious.
The function takes three arguments:
unsigned int width– Width of the icon in pixelsunsigned int height– Height of the icon in pixelsconst sf::Uint8* pixels– Pointer to the first element of an array of RGBA pixel values
The first two arguments don't really need explanation, the important bit is that they are measured in pixels. The third argument however isn't exactly obvious.
Using an sf::Image
The simplest approach for setting an icon is to load an image with sf::Image. Then you can use the corresponding functions to get the required values for setIcon.
![]()
Custom Pixel Array
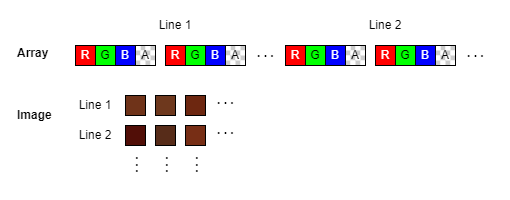
In SFML a pixel is always represented by a color values and a position.
- The color in this case is split up into the color's four components and represented as four
sf::Uint8. For more details read How to Use Colors in SFML. - The position in this case is implied by mapping the 2D representation of the image given the width and height onto a 1D array. To understand this concept read 2D Data in a 1D Array.
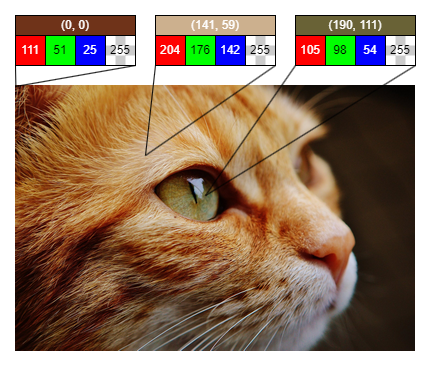
In conclusion the function expects an array of size width * height * 4 where each sf::Uint8 is a component of a color. Four of those values represent a pixel and all the pixels of an image are read from top left, going left to right, line by line to bottom right.
The following example uses a 3 x 3 image with one row of red, one row of green and one row of blue colors. Note however that your OS will most likely scale the image up, so the end result is interpolated.
![]()